Tuesday 28 January 2014

Word Scramble Solved... and a Finished computer bag

Remember these letters?


Last week I asked you, what do you think these letters spell?  They were not all shown on the pictures, so here they are:

B  D  E  G  G  H  I  I  N  N  N  N  O  O  O  T  T  U

Here is the first hint:  it's something in both of Canada's official languages. 

And because that wasn't enough for people to guess, here is another hint:  four words.  Two in each language.  And as Allison commented, it is most definitely one of those things will be very obvious as soon as I tell you.

I promise I will solve this by the end of the post, but before I do, I have a finish to share.

My niece hinted that she wanted a bag to carry her computer to school.  Well, it wasn't just a hint.  She literally gave the measurements to her grandmother - my mom - to give to me, "in case I felt like making her a bag".  I'm telling ya...

But I love my niece so I was happy to oblige.

Here is the front....


...and here's the back.


I used the quilt as you go technique - becoming quite addicted to it.

She didn't want anything fancy, but I really wanted to add a pocket in case she needed to carry a battery pack or something...


And then I thought, well, what if she needs to carry a small thing, like a USB drive.   these things can get lost easily...  so a zipper I added.  Oh, what work that was!  Probably because I thought "I don't need to follow a pattern".  Anyway, it took a few tries, but I got it right.


Don't you just love that big letter print?  I just looked it up, it's called Letterpress in multi, from the Just My Type Collection by Patty Young for Michael Miller.


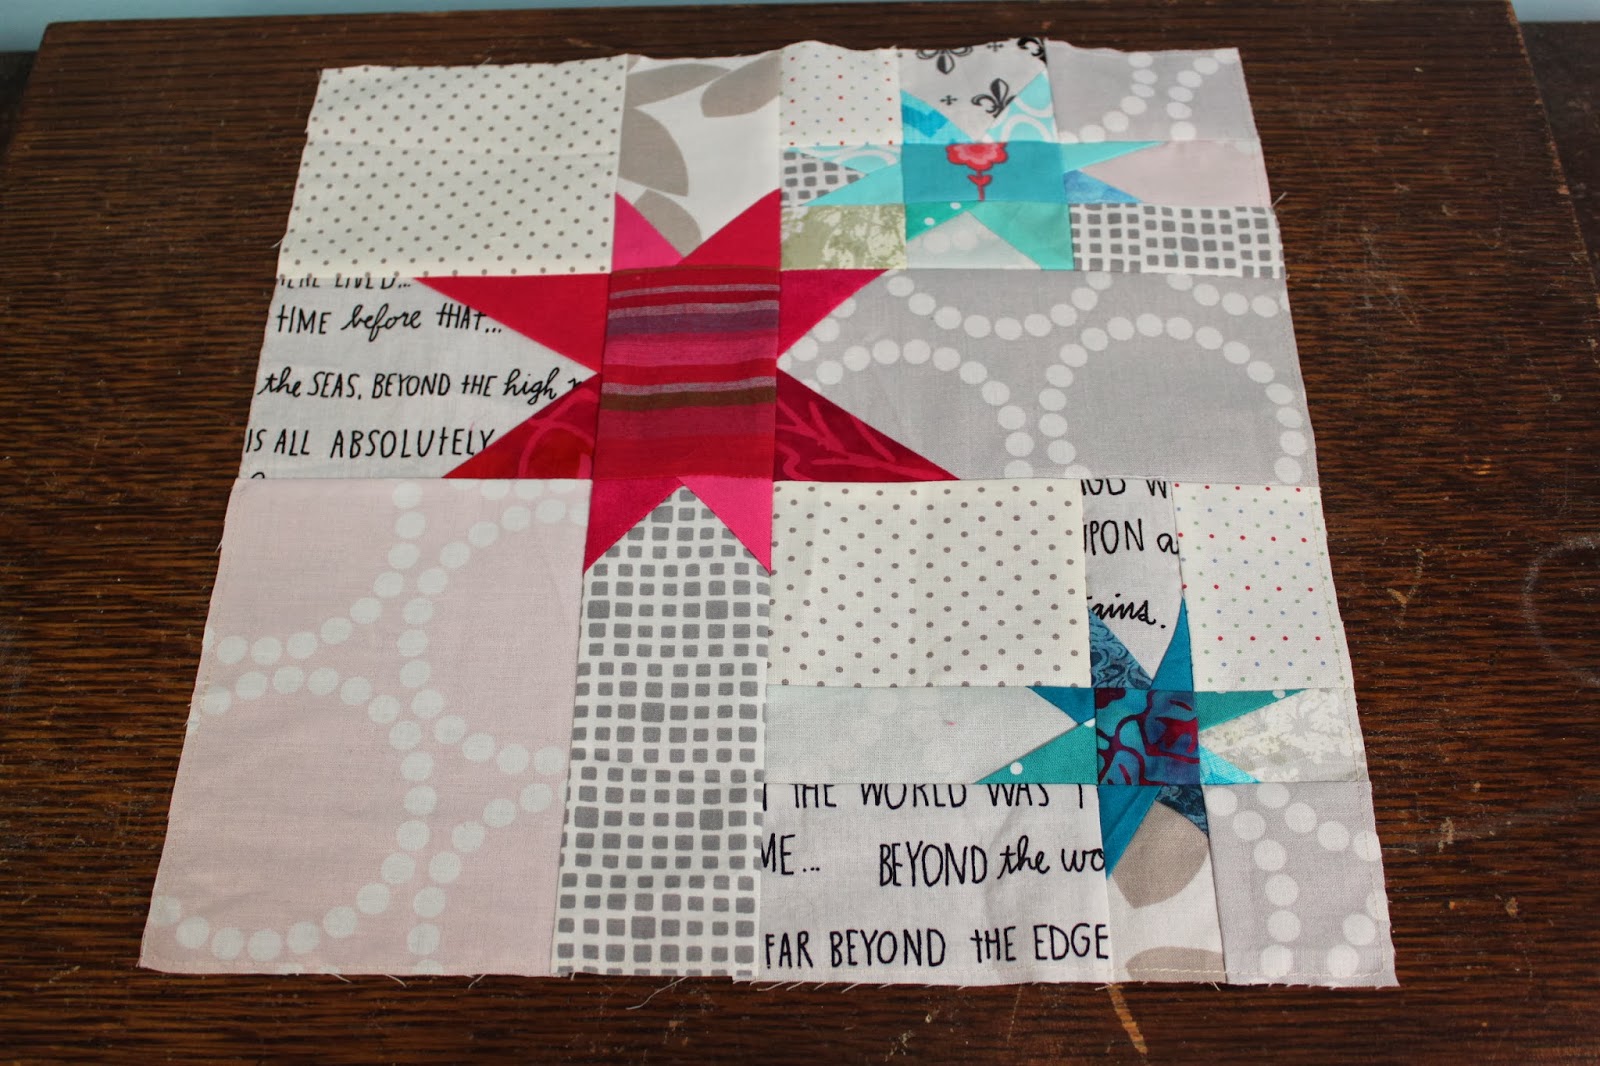
I am really loving this colour combo: Soft green, dusty rose, mauve, mustard yellow, with a hint of bright orange-y pink.

Still working on the word scramble?

B  D  E  G  G  H  I  I  N  N  N  N  O  O  O  T  T  U

How about another hint?  It is to go in the back of a quilt.  A bed quilt.  You know, a quilt that goes on a bed...  You know, the bed... the place where we... No, not that!  The other thing... 

OK, so now I need to insert another picture here so you don't see the solution right away.  I have shown these already, but I am showing them again to keep with the colour scheme.  I simply can't get enough of those colours!


Well, I promised I would give you the solution of the word scramble, but it's late here, and I am very tired, so...


Or, as we say in French...


;)

Linking up to Lorna's Let's Bee Social at Sew Fresh Quilt.

Wednesday 22 January 2014

Wonky Star Tutorial for Jenn

So Jenn wanted a tutorial for this block:


I did not feel like re-doing this block, so I made different one - same idea.  I am sure someone else has done a tutorial on these wonky stars, but I have not seen one, so here is my version.

Wonky Star Tutorial

First, even though the stars are wonky, the block is not improvised.  The size of each piece is determined before.  Little work up front, less headache later.

Determine the size of the finished block.  I am going for 9".   Divide the block in an uneven 9-patch (or an even one, if you feel like it):


Note that these are finished sizes.

Next, determine the unfinished size of each piece by adding 1/2" to each measurement.  See my little chart below:


L.V. stands for low volume, but I had a change of heart and went for a nice aqua instead.  Here are my 9 patch pieces:


Then I cut 4 squares, approx. 3" - 4" (some were actually rectangles) and sliced them diagonally to make 8 triangles.  These will form the star points.  Here is the placement, but of course the points will look much smaller with seam allowance.


Sew each triangle, making sure they will cover the corner of the pink rectangle.  There are other methods to do this, including using a square.  I simply cut my triangles a generous size and trimmed later.


I might have kept the corner of the original piece (fuschia background) but since it is darker than the triangle, I chose to cut it.  It also reduces bulk.


Sew the second corner.  Repeat for the four "side" pieces.


Trim each side piece (you may need to refer to your original chart).  Now, you essentially have a nine patch ready to assemble.


Ta-da!


I used the same method to draft this block: 


The only difference is that I took two of the corner pieces, and sub-divided them into smaller wonky star blocks.

So... what am I going to do with this 9" block?  I don't really have a need for it, and I certainly don't want to start another project...  Hmmmm... how about adding a low volume border to make this a 12" block and sending it to my bee mate as a little extra?


It's not exactly what she asked for, but perhaps she can use it for the back of her quilt.  After seeing the complex blocks made by the other bee members, I did not want to be seen as a slacker!   So I am sending two simple blocks instead of one complex one.  Don't they look good together?


Hope you enjoyed the tutorial.  Happy Wonky Star making, Jenn!  I am looking forward to seeing your future Wonky Star quilt!

Monday 20 January 2014

Bits of Quilts

I am not one for "fiddly" things (my new favourite word).  Big squares and rectangles are my friends, with the occasional HST.  Surprisingly, I found myself working on not one, but two fiddly projects this week-end.  Without obligation.

First, a bee block.  My first block in my first bee, the Canadians Quilt {bee}.  Our January Queen Bee asked for stars - any star block, in these yummy colours with a low volume background.  I could have gone with an easy block, but one of my goals is to be a good bee member, so I figured I would up my game a little bit.  My design is quite simple, but it involved 49 pieces of fabrics.  Yes, people, 49 pieces!  I am sure I have made quilts that involved less than 49 pieces, backing and binding included!

So there it is:


Well, that was fun... fingers crossed that my Queen Bee likes it.

My second project has been in my mind for a while, when I started noticing quilts with pieced letters.  I kept putting it off thinking it would take too much time.  Recently, I came across this lovely mini, and I thought, I have to get to those letters. 


These will be part of this quilt back, if I ever get around to finishing it!


I actually managed the first 14 letters in one afternoon (with interruptions) and only have four more to go.  Most letters came together quickly.  The B, not so much, especially since I had to re-do it.  I have a G, an N and two O to go.  I will then sized them properly by adding a piece of beige to make them the same height, before adding spacers between each letter.

So what do you think these letters will spell? 

B  D  E  G  G  H  I  I  N  N  N  N  O  O  O  T  T  U

Scrabble, anyone?

Saturday 18 January 2014

More Personalized Cushions

If you have been here before, you know my favourite birthday gift for children is a personalized cushion.

Here is one I did not have time to blog about before.  That is what happens when you leave the design to me:


Squares are my go-to pattern.  The cushion is fairly similar to other ones I have made before, such as this one. Sweet, but not too original.

For the next one, I had a time constraint.  I was only able to start the day of the party.  The birthday boy's favourite colour is red, so I decided to skip the piecing and go for a solid red twill. 

I asked my son for input for the colour of the letters.  Turquoise was is choice, and he was very determined.  No room for negotiation!  I then asked him about his friend's interests, and he suggested I do a basketball in orange fabric.  I wasn`t sure about this colour mix, but it sounded easy enough.  Thanks to Clip Art for providing a good basketball model!  The ball and letters are raw-edge appliqué and the outline form part of the quilting.  I also quilted a couple curved "V" lines to simulate the movement of a bouncing basketball.


Designed by an 8 year old boy.  Pretty cool, huh?  It is very simple, but my son is thrilled with the result, and certain his friend will like it.

Friday 17 January 2014

The Library Project... I'm in!

Seems like everybody I know is doing the Library Project, brainchild of Adrienne at Chezzetcook Modern Quilts.  I want to play with the cool kids, so I am jumping in.  Basically, we chose projects from books we already have at home, and commit to making them. 

http://chezzetcookmodernquilts.blogspot.ca/2014/01/the-library-project-here-we-go.html

Most of the other quilters who have joined have more ambitious lists.  Me?  I am sticking to two.  Here they are:

Something from Sunday Morning Quilts by Cheryl Arkison and Amanda Jean Nyberg.


This is actually the first book that I have actually made projects from.  I made High Five and Up, Up and Away, as well as some slabs for Cheryl's Just One Slab project for Calgary.  The slabs were so enjoyable to make.  Very addictive.  I am thinking about making some of those slabs for me, though I have not yet picked my project. 

I am a bit concerned about copyright, so I won't post pictures of the various quilts in the book.  There are a few that use the slab technique, and it will be one of them, or a combination.  Or I may forget about the slabs, and go for a ticker tape.

I know, I know, I am supposed to actually pick a project... I am breaking the rules of the Library Project, but it's my challenge, and I am sticking to my indecisive state of mind until I really have to chose!

Here's my second book: American Patchwork & Quilting (from 1985!)


I picked up this book for about a dollar at an auction a few years ago.  It is straight out of the 80s, so you might be inclined to think there isn't anything in this book for modern quilters, but you would be wrong.  If you can get past some of the colour choices, this book is full of little gems. 

The one quilt I have been fascinated with is this one:


I don't particularly like the colours, and the alternate blocks don't work for me.  Neither do the sashing and borders... but look at the houses!  Can you picture them in bright modern colours?  I really want to try some of these houses blocks, and perhaps create my own variation.  I think it will make for a striking quilt.

That's all I am willing to commit to and that is a lot considering the little amount of time I have to actually quilt and everything else I have on the go.  Hopefully the library project gal will let me play!

Sunday 12 January 2014

Quilted Cover for Heated Seat ... Finished!

I said I would do it, and I did!  The "Lava Buns" cover is finished.


Yes, you can see my reflection in the windows.


If you missed my last post, the Lava Buns (who thinks of these names?) is a little heated seat that you take with you if you are going to sit in a cold place, such as an arena.  Great idea but, would you want to be seen carrying this?


I had to do something.  Had to.  And I did.  Here's the back, with a zipper (yay!)


And the quilted front.  Added the lime green to my first fabric pull for a bit of "zing".


I did not feel like making handles, so I just left a hole so that the original handles and Velcro can get through.


My husband got to try it first as I wasn't going to the arena today.  I gave him the camera and asked him to take lots of pictures in the hopes that one would be blog-worthy. 

Hmmm... Anyway...


If you are not used to hanging out in cold arenas and you are wondering why would someone need heated seat cover, check out the woman on the left.  She is wrapped up in a woolen blanket! Brrrr.

A Finished Quilt Top...

On a completely different note, a quilt top got finished today in my house, but not by me.

 My son started his quilt at age 6, it has been about 3 years in the making...  I chose the block (too complicated, what was I thinking?), and he chose the colors and the layout.  The blocks were done over a several years.  He enjoyed it - just didn't feel like working on it very often - but it was long and painful for me.  I had my old machine set up at a lower table, with a box to prop up the pedal, and that is what he used.  There was a lot of hand holding, and unpicking.


A few months ago, I gave away my old machine, so when my on asked to work on his quilt today, I set him up on the Bernina.  He has grown since he was 6, so all he needed was a little something to raise the pedal.   Now the Bernina has a feature I have not used much, but came really handy: Speed control.  Ahhhhhh!  What a difference!  The speed control allowed him to go nice and slow and control the fabric without being concerned with foot pressure.

All that was left to do was to assemble the 12 blocks.  I pinned and ironed, but he did all the sewing (removing pins, cutting thread, etc.) himself.  After about 30 minutes, he had this:

 
Needless to say, both mom and kid are very happy!

Saturday 11 January 2014

Must. Make. Quilted. Cover. For. Ugly. Item.

A parcel came in the mail today, a gift my husband ordered for me that somehow did not make it in time for Christmas.


What is it, and what does it do, you say? It sure isn't pretty...

Essentially, it is a seat cover that comes with a hot pack inside.  Heat the hot pad in the microwave, stick in into the cover, take it with you if you are going to sit somewhere cold.  It is meant to be warm, not hot, and to stay warm for 6 hours.  Here is what it looks like, opened: (pretend this pink chair somewhere out there in freezing temperature).

Ignore the mess, I was not going to take that thing on a special photo shoot...
I spend a lot of time at the rink, and I am always cold, so my husband thought I would appreciate having a warm seat on which to put my behind.   hmmm... okay, but I must say I was underwhelmed.  See, on my list of want-to-make, there was a quilted cushion to take to the rink, and now I have this purchased thing that is probably much better, but plain ugly.  Darn!

That's when my husband wisely said: "why don't you just make a quilted cover for it?"  Duh!  Didn't think of it.

Since he may want to use it (when he is going by himself of course, I won't give it up), I figured pretty, flowery fabrics would not do.  So I dug into my black and white stash and pulled those out:


mmm... nice, but boring.

Added a few scraps of aqua to royal blue:


Much better.  I may have stolen the idea from someone at guild meeting last night, but in any event, black and white and blue it is.

I am using the quilt as you go method demonstrated by Adrienne last night (I will link to the guild meeting pictures when they are up).


Well that's as far as I got tonight, but I am determined to get this baby done.  Soon. Before my next trip to the rink.

What are you working on?

Tuesday 7 January 2014

Fabulous Quilted Luggage Tags - Tutorial

What do you make for someone who travels?  Luggage tags, of course!

In my last post, I shared the luggage tags I made for Christmas.  I have made a few more since, and after a few trials and errors, I am ready to share my first tutorial.

Here is how to make fabulous luggage tags out of scrappy bits of fabric.

Requirements

- Fabric scraps
- Batting scrap, about 4"x6"
- Fusible web, about 4"x6" (optional)
- Clear plastic, about 3"x 4"*
- Ribbon, approx. 12"

*I bought plastic for clear tablecloth, sold at fabric stores.  It occurred to me afterwards that I could use recycled packaging I have at home, such as those you get when you buy a set of bed sheets.


Back of tag

1 - Sew tiny scraps together to make a piece at least 4" x 6".  This will be the back of your tag.


2 - Layer your piece with batting and quilt as desired.  I quilted random diagonal lines on mine.


Front of tag

3 - Cut a piece of clear plastic 2 1/2" x 4".

4 - Put the clear plastic over a scrap that is at least a little bigger.  Make sure there is some extra fabric at one end (where your opening will be).  On the picture, I left the tissue paper that came with the plastic, so you can see better.  This will be removed.


 5 - Add strips of fabrics on three sides, as if you were building a log cabin block.  Again, I have left the paper for the picture, but removed it before sewing the strip onto the main part.   Remember to flip your work when ironing, so you don't apply the hot iron directly on the plastic.


Notice how I added four "logs" instead of three?  That is because my tag was not quite long enough.  I made sure the fourth log was not sewn onto the plastic bit.  You want to leave one opening!  Your tag front should be approx. 4" x 6".

 7 - Iron a piece of fusible web onto the wrong side of this piece - this step is optional.


Not shown: You could also top stitch your logs, around your clear plastic - I forgot to do it for this tag, but you I did for the next ones and it looked better.  See the tags at the very end of this tutorial.

 Assemble

8 - Trim both pieces to desired finished size + 1/2".  Mine was about 3-7/8" x 5-3/4".  Cut the top corners in an angle, or round them off.


9 - Cut a piece of ribbon about 10" - 12".  Layer your pieces together right sides facing each other, with the ribbon tucked in the middle as per the picture.   Pin or clip in place.  Make sure you don't accidentally catch the middle of the ribbon when pinning or clipping the bottom end (see third picture below).


10 - Sew around the edge, leaving an opening on the longest side (make sure you backstitch on each side of the opening).  Trim the corners to reduce bulk.


11 - Turn your work right side out.  Press and pin your opening shut.  Again, remember not to press the plastic directly.  Top stitch all around.


You are done the sewing part!

Finishing touch

11 - Insert the recipient's business card or a piece of cardstock 2" x 3 1/2".  I am not much of a scrapbooker, but I did buy some letter stickers and used them to identify the cardstock with the recipient's initials.  The personal info can be written on the back, therefore protecting privacy.


Admire your Fabulous Luggage Tag!


Notes:

Want to simplify things a bit?  Forget about the log cabin construction and just sew the plastic bit over the front of the tag (on three sides).  My machine did not like sewing directly on the plastic, so for the second one, I left the tissue paper, and removed it afterwards.


These were the first ones I made and for some odd reason, I made buttonholes for the ribbon.  This was completely unnecessary, I would not recommend it.

And below are the last ones I made.  I did not have the right color of ribbon for one of them, so I used a plain white ribbon and covered it with fabric.  That worked out well.


I also topstitched around the plastic part, about 1/8" on the logs.


I loved making these.  Such a satisfying project... I can see many more of those luggage tags in my future.  No one is going to lose their luggage on my watch!